
As one who eats very few animal products, I am often looking for creative ways to add protein into my diet. This Mocha Protein Nut Bars recipe qualifies for raw, gluten free, free of added sugar, vegan, and high protein all in one.
Best of all, these nut bars are delicious!
MOCHA PROTEIN NUT BARS
Blend together in Vita-mix or high speed blender:
1 cup raw organic pecans
1 cup raw organic walnuts
8 drops coffee essential oil
1/2 t. unrefined sea salt
You will need to pulse several times to make a fine ground that is the texture of a dry chunky nut butter. When the mix holds together fairly well, scrape it out into a small bowl and add:
3 Tablespoons of Sunwarrior Classic Protein Powder (chocolate flavor) or another chocolate protein powder of your choice
4 dates, without seeds
4 Tablespoons pure organic chocolate powder or cocoa
Stir well. Shape into small bars or round cookies. You can eat them right away, or put them in the fridge for up to 24 hours.
If you would like, you can also make a chocolate topping. It is not vegan, unless you use the vegan substitution.
CAFE TOPPING
Combine in a small bowl:
2 cups plain yogurt with live cultures (we use home made goat milk yogurt)
1/2 teaspoon stevia powder (to taste)
1 teaspoon vanilla extract (we use an alcohol free version)
8 drops coffee essential oil
Spread the topping over bars just before serving. This is a rich and flavorful dessert or snack that everyone will enjoy.
Vegan substitution: Instead of using yogurt, substitute 2 cups of coconut cream, or culinary coconut milk that has been refrigerated for at least 1 hour. The vegan version will be a little thinner, but still delicious!

Herbal Remedies for Hernia
There are several types of hernias, and not all of them are conducive to healing with natural remedies. Hernias can be serious and should be examined by a health professional.
Inguinal hernias (groin area), umbilical hernias (near the naval), and incisional hernias (following surgery) are the most likely to improve or heal with herbal remedies. Other types may improve, but should be evaluated before beginning an herbal treatment.
This is a three part method that will support hernia recovery in 3 different ways. It begins with taking an internal herbal remedy formula.
Internal Formula–Herbal Remedies for Hernia
These herbal remedies for hernia are derived from traditional Chinese formulas used for centuries to heal hernias and other abdominal issues. I have offered here 2 different choices, for those who may have a challenge locating some of the herbs. Both of these formulas are effective.
Hernia Formula One
Hawthorn berry-2 parts (Chinese hawthorn berry)
Fennel seed-1/2 part
Grapefruit seed-1/2 part
Litchi seed-1/2 part
Mix the herbs together in a blender or Vita-mix. Mix on high until a coarse powder is formed. Put the powder into size 00 capsules, and take 1 to 2 capsules 2 times daily.
Alternatively, the powder can be made into a tea. Use 1 teaspoon of ground herbs in 2 cups of water. Simmer for 5 to 8 minutes and strain. Sweeten with honey or stevia if desired. Drink 1 cup daily.
Or, use the following formula instead.
Hernia Formula Two
Hawthorn berry–2 parts
Dioscorea (wild yam)–1 part
Marshmallow root–1 part
Ginger root–1/2 part
Licorice root–1/2 part
Use the same methods as described above. You may use it as a tea or in capsules.
Plan on taking your herbal formula consistently for at least 3 months. Herbs often take weeks to show results, as they rebuild organs and tissues on a slow, gradual basis. It is necessary to use them every day to get the desired results.
Hernia Poultice
To support your recovery, you will also benefit from applying a poultice to the local area where the hernia is located.
Comfrey powder (or crushed leaf)–6 parts
Colloidal silver–1 part
Terebinthine pine essential oil–several drops
Cypress essential oil–several drops
Costus root essential oil–several drops
Distilled water–as needed
Combine all ingredients. Add only as much distilled water as necessary to moisten all of the ingredients and help them stick together. Apply enough of the poultice to lightly cover the hernia area. If possible, wrap it with saran wrap to hold it against the skin without drying it out. Leave it on for a few hours, or overnight if possible.
Apply it every day for the best results.
Targeted Exercise
The final piece of the puzzle for healing hernias, involves exercise. It is important to exercise very consciously–being certain to do no harm! Targeted gentle exercises to strengthen core muscles can be found on you tube. Always begin gently with just a few repetitions, and never continue if there is pain with any exercise.
Dietary Considerations
These dietary changes can also help support hernia recovery. Eat plain, unsweetened yogurt with live cultures (not the sweetened dessert kind), several tablespoons daily. My favorite brand to recommend is Mountain High, but the best is the one you make yourself with un-homogenized cow or goat milk. One tablespoon of home made yogurt contains more live probiotic cultures than a whole bottle of encapsulated probiotics!
Also eat smaller meals more often throughout the day. Avoid having any bloating or acid reflux, or even indigestion, by taking Ginger Drops remedy or Herbal Digestive Bitters as soon as any of these symptoms appear.

Essential oils can not only help us heal our bodies. They are also very handy in gardening, as a pest deterrent. We have used this recipe to discourage cabbage worms from eating our broccoli, cabbage, kale, and other plants.
It also works against many types of caterpillars, and does not seem to discourage Lady bugs or the Preying Mantis–both of which are beneficial pest eating bugs for your garden.
I found this recipe through dowsing, and it seems to work very well. I sprayed it twice in one week, after finding a large infestation of cabbage worms in several areas of our high tunnel garden.
By the second spraying, the infestation was down to just a few worms where there had been many.
The following week I sprayed again, even though we were not finding worms on 90% of our crops. It seems they have relocated, although we are prepared to spray again if they reappear. This formula does not seem to kill the caterpillars, but does make them go elsewhere quickly!

How to Tell That You Have Cabbage Worms
- Small to medium sized green caterpillars on the underside of leaves, especially broccoli, cabbage, eggplant, kale. Possibly other plants too.
- Large holes in leaves, begin to make the leaf look like lace.
- Small black droppings on leaves.
- Occasional cocoons on the underside of leaves.
- May see small grayish moths.
Recipe for Cabbage Worm Spray
Mix together
1 gallon of water
2 tablespoons Dr. Bronner’s soap (or other castille soap)
10 drops cayenne CO2 extract
20 drops peppermint essential oil
2 drops garlic essential oil (contact us for availability) or 1 clove of garlic mixed in blender with 1 cup water
Shake well. Put spray in a garden sprayer or spray bottle. Spray tops and undersides of leaves.

This cocoa butter deodorant recipe is completely free of dangerous chemicals and ingredients. It is
- Phthalate free
- Gluten free
- Glycerin free
- Aluminum free
- Preservative free
- Sulphate free
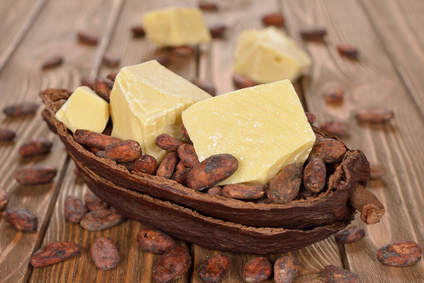
Cocoa Butter Deodorant Recipe
Ingredients:
1 teaspoon beeswax
2 to 3 tablespoons baking soda
8 tablespoons (4 ounces) organic cocoa butter
2 tablespoons cold-pressed unfiltered coconut oil
You will also need:
A plastic fork
A plastic deodorant tube, or a soap mold
Small saucepan
Directions:
Put the beeswax into the pan, along with the coconut oil and cocoa butter. Heat the pan over the lowest heat setting.
Once the beeswax, cocoa butter and oil are completely melted, turn off heat and allow the mixture to cool.
Stir the melted ingredients with the plastic fork. Add the baking soda and stir very well.
Allow the mixture to cool, stirring frequently to keep it well mixed. You may set it in the refrigerator to speed the cooling process. Be sure to keep stirring frequently.
When mixture is fully cooled and somewhat stiff, but still creamey enough to spoon up, spoon the mixture into the container, pressing it in, and set it into the refrigerator to solidify.
If you are using a soap mold instead, spoon the mixture into the soap mold, and set it in the refrigerator.
Note:
You may need to store your deodorant in the refrigerator in summer months. If you want to make your finished product firmer, try adding a little more beeswax to the mix.

Ant Bug Spray
Typical ant killer is filled with toxic chemicals–ones that we choose to avoid using in our home. Imiprothrin and Cypermethrin are linked with toxicity in humans causing neurological changes, wheezing, seizures, and are classified as “possible carcinogens”. The PubChem chemical database gives great information on the toxicity of these chemicals.
Ingredients
3/4 cup white vinegar
1/4 cup water
20 drops clove essential oil
20 drops leleshwa oil
20 drops peppermint oil
1 tsp liquid castile soap
To Make
Combine all ingredients in your spray bottle and gently mix. Store away from light and heat to preserve the oils.
To Use
Spray ants directly with the Ant and Bug Spray. Also spray any pathways that they have been traveling, and allow the spray to sit there for 20 minutes,or even until it dries if possible.
Toxicity
This spray is non-toxic to animals and people. However, it should be kept out of reach of children and animals. Do not spray it in eyes or take internally.

I had been “sudsing shampoo free” for years. One day I just got tired of putting chemicals on my head, and I began a long journey of exploring my options.
I found that so many “natural” shampoos were still laden with chemicals, phthalates, and a multitude of other chemicals. I found several non-sudsing shampoos on the market, but none of them worked for me long term.
Finally I resorted to using the coconut shampoo bar from Chagrin Valley. It worked very well, but sometimes I would feel like the soap was leaving a build up on my hair, so I would switch back and forth with my own suds-free shampoo recipe and the soap.
This has worked beautifully for me over some years now, but every now and then I wish for a really truly natural sudsing shampoo base that I could use once in awhile.
Then we found a source that produces clean, certified organic sudsing bases. These bases are certified organic by EcoCert, an approved for use in Whole Foods products. We immediately fell in love with these products. We now offer them online for our customers. (Decyl Glucoside is available for skin and shampoo formulations; Laurel glucoside is better for household cleaning products, dishes and laundry).
I have already experimented with a couple of my own shampoo recipes, and I am sharing them now for you to experiment with too.
Natural Sudsing Shampoo Recipe
Note: This recipe requires the use of a hand held stick blender.
1/2 cup Decyl glucoside
6 tablespoons rose hydrosol or water
4 tablespoons aloe vera gel (not juice)
6 drops seabuckthorn seed, argan, or neem botanical oil
1/16 teaspoon spirulina powder
1/8 teaspoon vitamin C powder
1/8 tsp xanthin gum
(If you need extra conditioning, add 1/2 teaspoon protein powder)
DIRECTIONS:
Stir the Xanthin gum into 2 Tbsp of the water. Stir very well until there are no lumps and product is smooth.
Place the rest of the water or hydrosol, decyl glucoside, and aloe vera into a 16 oz container for use with your stick blender.
Add xanthin gum mix and blend thoroughly, moving the stick blender up and down until the shampoo thickens and no lumps remain.
Add the rest of the ingredients and blend again.
Test with a ph testing strip. Ph should be between 5 and 7 for shampoo. If ph is too high, add more vitamin C.
Options
You can experiment with using soy protein powder, silk protein powder, hemp powder, etc. Many types of protein powder could be a candidate for nourishing and conditioning the hair.
If you want to add essential oils for therapeutic reasons or for scenting, add just a few drops to see how the formula handles it. Every oil addition will affect the sudsing quality of the base. You must find the balance between oils for conditioning and sudsing shampoo base for cleansing.
Essential Oils for Hair Loss
If you are experiencing hair loss, you may want to try these essential oils or a combination of several. These are the most recommended oils for restoring hair and stimulating the scalp.
Essential Oils for Dandruff
For dandruff, try adding one or several of these oils.
Watch for our updated Decyl Glucoside based mud shampoo recipes coming soon!)

Snoring Solutions with Essential Oils
Snoring is one of those issues that effects not just the snorer, but his or her partner as well! Snoring is associated with sleep apnea, which is a major cause of chronic fatigue, health issues, and even emotional and mental disturbances. And, well–it’s just not sexy.
So if there was an easy and enjoyable way to reduce or eliminate snoring, wouldn’t you jump at the chance to give it a try? I just have to share this with everyone I know, because it has made such a difference in the lives of some of my customers.
This recipe contains some of the most studied oils found to be effective against snoring and sleep apnea. If the recipe below is not quite strong enough, you can resort to the stronger version, which has even more clout, but also has a stronger aroma.
To enhance your potential for success, you can try the following things:
- 20 to 30 minutes before bedtime, diffuse Snoring Solutions Diffusion Blend (see recipe below) in your bedroom. Once you actually go to bed, you can turn the diffuser off, as the air should be saturated.
- Massage neck, upper back, and chest with Anti-Snore Massage Oil (recipe below) just before going to bed. For an extra insurance, massage the oil onto the bottom of your big toes, which are reflex points to the head.
- Use a wedge pillow, or two pillows so that you are on an incline when you sleep.
- Another study found that sleeping on your side, with a full body pillow, works for many people.
- Don’t drink alcohol–it causes the back of the throat muscles to relax enabling snoring. People who don’t normally snore will often snore after consuming alcohol before bedtime.
- Use a neti-pot with saltwater solution to open breathing passages before going to bed.
Anti-Snore Massage Oil Recipe
30 ml or 1 ounce of carrier oil, sweet almond or jojoba
7 drops lavender essential oil
7 drops lemon essential oil
7 drops marjoram essential oil
7 drops Atlas cedar essential oil
16 drops owyhee essential oil (peach artemisia)
Combine oils in a 1 ounce bottle. Shake well.
Massage on neck, upper back, shoulders, and chest, just before you go to bed. Keep the bottle within reach so you can use it again if you should awaken from snoring in the night.
Super Strong Anti-Snore Massage Oil Recipe
Replace essential oils in the recipe above with:
7 drops peppermint essential oil
10 drops thyme linalol essential oil
10 drops lavender essential oil
7 drops river red gum essential oil (eucalyptus camaldulensis)
10 drops owyhee essential oil
Mix and use the same as the first recipe. Rosewood, spruce, citronella, geranium, and clove have all been used successfully for sleep apnea and snoring as well. Please feel free to experiment with this!
Snoring Solutions Diffuser Blend Recipe
In a 5ml bottle, combine:
1 ml (20 drops) thyme linalol essential oil
1 ml (20 drops) river red gum essential oil
1.5 ml (30 drops) rosewood essential oil
1 ml (20 drops) owyhee essential oil
0.5 ml (10 drops) clove essential oil
Diffuse this blend for 20 minutes before you go to bed every night.
Some people notice a decrease in snoring in as little as 3 nights. Others may take up to 6 weeks to see results, so don’t give up too early.
Sometimes people can eventually go without using the essential oils after a period of time on this program. Others find that they need to stay consistent to keep sleep apnea or snoring from returning. Either way, it is a great tool for getting a good night’s sleep (and saving your marriage too!).

Many people are getting wise to the chemical based body care products that are marketed to consumers in the USA. Every year I talk with more people who are seeking chemical free products. But even the best products in the health food store contain a few unpronounceable chemical ingredients and preservatives even though they are advertised as “natural”.
Many natural deodorants no longer contain aluminum. But they still may contain glycerin, phthalates, and chemical preservatives.
So what does one use when eliminating chemicals? The only way I know of to truly know what you are putting on your body, is to make your own products.
I and others I know, have thrived for many years using a home made under-arm spray containing only essential oils and hydrosol. But if you are opposed to having to use your deodorant several times throughout the day because it wears off quickly, you might get a better result from using this easy natural deodorant bar recipe.
Natural Deodorant Bar Recipe
Ingredients:
1 teaspoon beeswax, melted
4 tablespoons baking soda
5 tablespoons cold-pressed coconut oil
4 drops leleshwa essential oil
3 drops geranium essential oil
You will also need:
A plastic fork
A 1 pint sized mason jar
Saucepan
Plastic wrap and a small jar or cup OR a soap mold
Put the mason jar into the sauce pan. Add enough water into the pan to cover the sides of the jar 2 to 3 inches.
Put the beeswax into the mason jar, along with the coconut oil. Heat the pan over low heat.
Once the beeswax and oil are completely melted, turn off heat and remove the mason jar from the pan.
Stir the melted oil and wax with the plastic fork. Add the baking soda and stir very well.
Allow the mixture to cool, stirring frequently to keep it well mixed.
When mixture is cooled to room temperature, line your cup or small jar with plastic wrap. Pour the mixture into the container and set it into the refrigerator to solidify. If you are using a soap mold instead, pour the mixture into the soap mold, and set it in the refrigerator.

Allow several hours for the bar to cool completely. Then remove the bar from mold or jar.
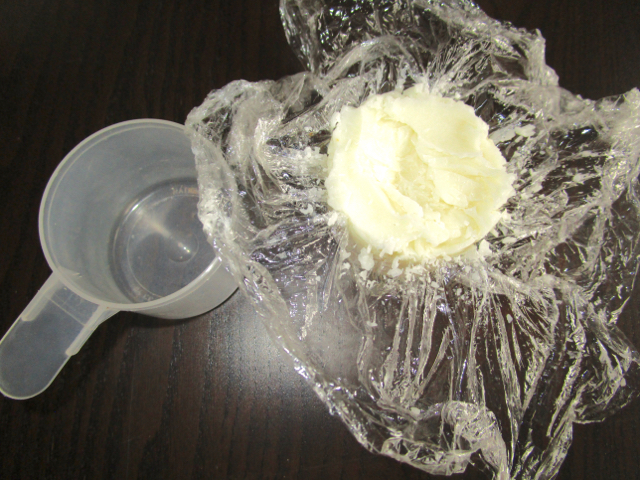
If you used a small jar, cup, or long shape, you can wrap half of the bar with plastic wrap.

For added ease in handling, wrap a layer of tissue paper on top of the plastic. Tape it together so it stays. Now the bar is easy to apply to underarms without touching.

In the summer season, you may need to store your deodorant bar in the refrigerator. If you have a cool bathroom closet, you may be able to store it there. Just remember, coconut oil liquifies at around 76 to 78 degrees.
Deodorant and Cancer Recovery
One of the first things to consider when facing cancer recovery, is the elimination of phthalates and other chemical ingredients from all body care products.
Deodorants are one of the worst culprits in the “harmful for cancer patients” category. They contain at least several substances that don’t contribute to recovery–including phthalates, aluminum derivatives, and others. Even a lot of the “natural” deodorants found in health food stores and supermarkets, are packed with chemicals that just do not belong on a woman’s body when she is recovering from this disease (in my humble opinion).
Not to mention the fact that deodorant is applied to the underarms, in the very same location where lymph glands are often infected with cancer. Does that seem like a coincidence to you?
I don’t believe in coincidence.