
This cocoa butter deodorant recipe is completely free of dangerous chemicals and ingredients. It is
- Phthalate free
- Gluten free
- Glycerin free
- Aluminum free
- Preservative free
- Sulphate free
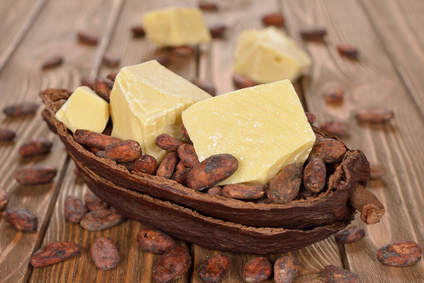
Cocoa Butter Deodorant Recipe
Ingredients:
1 teaspoon beeswax
2 to 3 tablespoons baking soda
8 tablespoons (4 ounces) organic cocoa butter
2 tablespoons cold-pressed unfiltered coconut oil
You will also need:
A plastic fork
A plastic deodorant tube, or a soap mold
Small saucepan
Directions:
Put the beeswax into the pan, along with the coconut oil and cocoa butter. Heat the pan over the lowest heat setting.
Once the beeswax, cocoa butter and oil are completely melted, turn off heat and allow the mixture to cool.
Stir the melted ingredients with the plastic fork. Add the baking soda and stir very well.
Allow the mixture to cool, stirring frequently to keep it well mixed. You may set it in the refrigerator to speed the cooling process. Be sure to keep stirring frequently.
When mixture is fully cooled and somewhat stiff, but still creamey enough to spoon up, spoon the mixture into the container, pressing it in, and set it into the refrigerator to solidify.
If you are using a soap mold instead, spoon the mixture into the soap mold, and set it in the refrigerator.
Note:
You may need to store your deodorant in the refrigerator in summer months. If you want to make your finished product firmer, try adding a little more beeswax to the mix.

I had been “sudsing shampoo free” for years. One day I just got tired of putting chemicals on my head, and I began a long journey of exploring my options.
I found that so many “natural” shampoos were still laden with chemicals, phthalates, and a multitude of other chemicals. I found several non-sudsing shampoos on the market, but none of them worked for me long term.
Finally I resorted to using the coconut shampoo bar from Chagrin Valley. It worked very well, but sometimes I would feel like the soap was leaving a build up on my hair, so I would switch back and forth with my own suds-free shampoo recipe and the soap.
This has worked beautifully for me over some years now, but every now and then I wish for a really truly natural sudsing shampoo base that I could use once in awhile.
Then we found a source that produces clean, certified organic sudsing bases. These bases are certified organic by EcoCert, an approved for use in Whole Foods products. We immediately fell in love with these products. We now offer them online for our customers. (Decyl Glucoside is available for skin and shampoo formulations; Laurel glucoside is better for household cleaning products, dishes and laundry).
I have already experimented with a couple of my own shampoo recipes, and I am sharing them now for you to experiment with too.
Natural Sudsing Shampoo Recipe
Note: This recipe requires the use of a hand held stick blender.
1/2 cup Decyl glucoside
6 tablespoons rose hydrosol or water
4 tablespoons aloe vera gel (not juice)
6 drops seabuckthorn seed, argan, or neem botanical oil
1/16 teaspoon spirulina powder
1/8 teaspoon vitamin C powder
1/8 tsp xanthin gum
(If you need extra conditioning, add 1/2 teaspoon protein powder)
DIRECTIONS:
Stir the Xanthin gum into 2 Tbsp of the water. Stir very well until there are no lumps and product is smooth.
Place the rest of the water or hydrosol, decyl glucoside, and aloe vera into a 16 oz container for use with your stick blender.
Add xanthin gum mix and blend thoroughly, moving the stick blender up and down until the shampoo thickens and no lumps remain.
Add the rest of the ingredients and blend again.
Test with a ph testing strip. Ph should be between 5 and 7 for shampoo. If ph is too high, add more vitamin C.
Options
You can experiment with using soy protein powder, silk protein powder, hemp powder, etc. Many types of protein powder could be a candidate for nourishing and conditioning the hair.
If you want to add essential oils for therapeutic reasons or for scenting, add just a few drops to see how the formula handles it. Every oil addition will affect the sudsing quality of the base. You must find the balance between oils for conditioning and sudsing shampoo base for cleansing.
Essential Oils for Hair Loss
If you are experiencing hair loss, you may want to try these essential oils or a combination of several. These are the most recommended oils for restoring hair and stimulating the scalp.
Essential Oils for Dandruff
For dandruff, try adding one or several of these oils.
Watch for our updated Decyl Glucoside based mud shampoo recipes coming soon!)

This is my favorite recipe for skin lotion. It is a bit lighter than salves and some of the other lotions that use beeswax to emulsify the fat with water. And the Aloe has a wonderful tightening effect on skin, wonderful for skin that is flabbier aging, or for people who have recently lost weight and have excess skin.
It does create a bit of shine on your skin when applied. I often apply it at night before going to sleep, and allow it to work deep into my skin over night. I have been so happy with the results that I could not wait to share it with everyone.
This lotion is a little more challenging to make than the simple 4 ingredient salve, but it is definitely lighter than any salves made with oils and beeswax only.
Aloe Vera Skin Lotion Recipe
1 tablespoon plus 1 teaspoon beeswax (chunk or shavings)
1/2 cup sweet almond oil
1 teaspoon seabuckthorn seed CO2 extract
1/2 cup aloe vera gel

Place beeswax, almond oil, and seabuckthorn extract in a pint mason jar. Put the open jar into a saucepan. Fill the pan with water, up to 2 or 3 inches up the side of the jar.
Heat pan over low heat. Stir frequently with a plastic or wood spoon or fork. Do not leave utensil in the wax & oil mix, remove each time after stirring.
When the beeswax has completely melted, turn off the heat and remove the jar from the saucepan. Place it on a trivet or hot pad to cool.
If you want to add optional essential oils, now is the time to add them and stir them in well. About 15 drops total is a good amount to add.
Allow mix (also called fat phase), to cool to room temperature. It should just begin to harden sightly around the edges. This will insure that it emulsifies correctly.
You can use a fork, whip, or an immersion blender for this step. Start blending vigorously, and add aloe vera gradually, just a little at a time. Stir after each addition until fully incorporated, then add more and repeat.
Wipe the jar sides down with a spatula and re-blend a couple of times after the mix is fully incorporated.
This Aloe Vera Skin Lotion recipe will store in a glass jar for up to 6 weeks. You may extend the shelf life of this product by adding essential oils.
Essential Oil Suggestions
Add bitter orange, zdravetz, petitgrain sur fleurs, or neroli essential oils for tightening and “lifting” aging skin.
Add rose, lemon, or neroli essential oils for lightening dark spots or decreasing ruddiness and spider veins.
Add argan botanical oil, lavender and patchouli essential oils for preventing aging skin and wrinkles.
Add chamomile or everlasting essential oils, or acai or moringa botanical oils for sensitive or allergic skin.

Many people are getting wise to the chemical based body care products that are marketed to consumers in the USA. Every year I talk with more people who are seeking chemical free products. But even the best products in the health food store contain a few unpronounceable chemical ingredients and preservatives even though they are advertised as “natural”.
Many natural deodorants no longer contain aluminum. But they still may contain glycerin, phthalates, and chemical preservatives.
So what does one use when eliminating chemicals? The only way I know of to truly know what you are putting on your body, is to make your own products.
I and others I know, have thrived for many years using a home made under-arm spray containing only essential oils and hydrosol. But if you are opposed to having to use your deodorant several times throughout the day because it wears off quickly, you might get a better result from using this easy natural deodorant bar recipe.
Natural Deodorant Bar Recipe
Ingredients:
1 teaspoon beeswax, melted
4 tablespoons baking soda
5 tablespoons cold-pressed coconut oil
4 drops leleshwa essential oil
3 drops geranium essential oil
You will also need:
A plastic fork
A 1 pint sized mason jar
Saucepan
Plastic wrap and a small jar or cup OR a soap mold
Put the mason jar into the sauce pan. Add enough water into the pan to cover the sides of the jar 2 to 3 inches.
Put the beeswax into the mason jar, along with the coconut oil. Heat the pan over low heat.
Once the beeswax and oil are completely melted, turn off heat and remove the mason jar from the pan.
Stir the melted oil and wax with the plastic fork. Add the baking soda and stir very well.
Allow the mixture to cool, stirring frequently to keep it well mixed.
When mixture is cooled to room temperature, line your cup or small jar with plastic wrap. Pour the mixture into the container and set it into the refrigerator to solidify. If you are using a soap mold instead, pour the mixture into the soap mold, and set it in the refrigerator.

Allow several hours for the bar to cool completely. Then remove the bar from mold or jar.
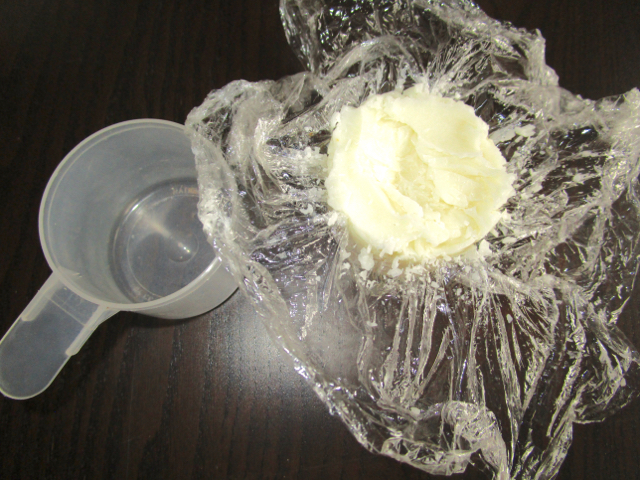
If you used a small jar, cup, or long shape, you can wrap half of the bar with plastic wrap.

For added ease in handling, wrap a layer of tissue paper on top of the plastic. Tape it together so it stays. Now the bar is easy to apply to underarms without touching.

In the summer season, you may need to store your deodorant bar in the refrigerator. If you have a cool bathroom closet, you may be able to store it there. Just remember, coconut oil liquifies at around 76 to 78 degrees.
Deodorant and Cancer Recovery
One of the first things to consider when facing cancer recovery, is the elimination of phthalates and other chemical ingredients from all body care products.
Deodorants are one of the worst culprits in the “harmful for cancer patients” category. They contain at least several substances that don’t contribute to recovery–including phthalates, aluminum derivatives, and others. Even a lot of the “natural” deodorants found in health food stores and supermarkets, are packed with chemicals that just do not belong on a woman’s body when she is recovering from this disease (in my humble opinion).
Not to mention the fact that deodorant is applied to the underarms, in the very same location where lymph glands are often infected with cancer. Does that seem like a coincidence to you?
I don’t believe in coincidence.

When applying essential oils to skin, dilution creates a better potential for success. If oils are not properly diluted, they can create an unintended effect.
Essential oils should be diluted to a strength that imitates the way they are available in nature. Between a 1% to 4% dilution is a very good starting point for oils that will be applied to the skin.
1% dilution
For children, elderly, pregnant, very sensitive, inside nose, mouth, or ears
•8 drops essential oil in 1 oz. carrier
•4 drops essential oil in 1/2 oz. carrier (or 1 Tablespoon carrier)
•3 drops essential oil in 2 drams carrier
2% dilution
For full body massage, spinal compresses, and most applications
•15 drops essential oil in 1 oz. carrier
•8 drops essential oil in 1/2 oz. carrier (1 Tablespoon)
•5 drops essential oil in 2 drams carrier
4% dilution
For local inflammation, pain reduction, burns, wounds, sprains, funguses, infections, organ compresses, whenever stronger effects are desired
•30 drops essential oil in 1 oz. carrier
•15 drops essential oil in 1/2 oz. carrier (or 1 Tablespoon carrier)
•10 drops essential oil in 2 drams carrier
Stronger dilutions
Stronger dilutions are sometimes useful for certain applications. Wounds, burns, skin funguses, insect bites, and topical infections will often call for an oil from 50% to 100% essential oil (pure undiluted oil is referred to as “neat”).
- Equal amounts of essential oil and carrier make a 50% dilution
Nature’s Dilution Ratio
Keeping in mind the extreme concentration of essential oils, it is usually more effective to use highly diluted formulas, as they mimic the levels of aromatic substance as they occur in nature.
Every drop of essential oil produced contains the aromatic equivalent of 50 to 70 cups of herbal tea. One pound of lavender essential oil takes 1,000 pounds or more of lavender blossoms to produce. These are clues to use them sparingly and dilute well, honoring the true value of these natural gifts from the plant world.
None of our products are recognized or approved by the FDA. They are not intended to diagnose, treat, or cure any disease. This information is anecdotal, and is provided for educational purposes only. It is not meant to be taken as medical advice. See a health care professional for medical advice.
More about our disclaimer.

This high intensity blend for body pain is perfect for relieving muscular, nerve, joint, and connective tissue pain. Apply oil directly to skin right before massage. Or apply as a compress to painful muscles or joints, feet, or spine.
Wormwood essential oil 10 drops
Holy basil essential oil 10 drops
Oregano essential oil 5 drops
African bluegrass essential oil 20 drops
Lime essential oil 40 drops
Douglas Fir essential oil 30 drops
Clove bud essential oil 10 drops
Add the above essential oils into a 1 ounce bottle. Add your choice of carrier oil (filtered coconut is a good choice because it is thin of consistency and highly absorbable) to fill the bottle. Shake well.
Apply this oil to aching joints of muscles, or use as a massage oil to relieve body pain. It can be further diluted for use over the whole body.
It can also be added to the bath, add 1 to 2 teaspoons and soak in a warm to hot bath for 15 minutes to relieve pain.

Give yourself a gift of a home facial!
1) Wash your face with 2 T. oatmeal mixed with just enough water to make it wet. Rub oatmeal into face and scrub lightly. Allow it to dry and brush off residue with your fingers.
2) Blend together: 2 T. goat cheese, soft unsalted butter, or farmer cheese; 10 drops seabuckthorn seed oil; 10 drops rose otto (pure rose oil). Spread this blend around face and neck, using gentle upward and outward strokes. Allow it to sit for 15 minutes then gently brush off any residue.
3) Boil 2 cups of pure water with 1 T. astragalus root. Simmer for 30 minutes. Strain and add 20 drops lemon, sweet orange, or bitter orange essential oils. Place in a spray bottle and spray over entire neck and face. This can be prepared ahead of time and stored in the refrigerator for longer shelf life.
Repeat this facial treatment weekly. Over time, you will see your skin become vibrant and flexible, turning back the clock on the aging process!
This is a variation on a treatment shared with me by a woman from India. If you have ever noticed, many women of India seem to retain beautiful skin throughout old age, and my mentor believes this is the key to maintaining that vibrant skin.
