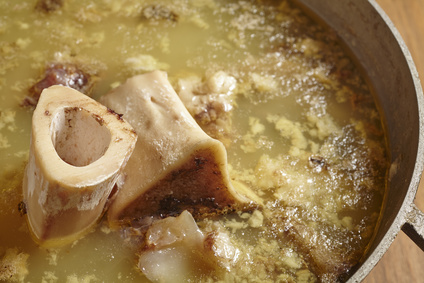
Hey friends, take a look at the Wonder Bag website. Not only does this bag enable us to slow cook many foods without burning fuel. It is also sold by a great company that gifts a Wonder Bag to a person in need in third world countries, one for every bag purchased online. That is the kind of company I love to support!
My first batch of Wonder Bag bone broth (a paleo diet staple, great for regenerating and reducing the effects of aging too) did not gel in the fridge, and was generally disappointing.
So, with the next batch I made some adjustments and it came out GREAT! It even gelled outside of the fridge as it cooled—a sign that it is very good bone broth, full of collagen and minerals.
So I wanted to share the details of how I made it work in the Wonder Bag.
Wonder Bag Bone Broth
1. First, I added a few chopped veggies with a couple tablespoons of olive oil into a 4 quart pot. I used celery, sweet peppers, carrots, beets, fresh thyme, sage, and savory, a couple of bay leaves, and 2 teaspoons of salt. I cooked them for about 5 minutes over medium heat just until they sizzled a little and the celery began to look translucent.
2. Then I added 4 quarts of water, 2 drops rosemary essential oil, and several large marrow bones from goat and buffalo. I also added 2 chicken feet, which are available from US Wellness Meats. You could substitute chicken wings for the feet, and beef bones for the goat or buffalo bones if you want to.
Be sure to use bones from wild or grass fed/pastured animals, raised without antibiotics, for the healthiest bone broth.
3. I brought the pot to a strong boil over high heat. Once it was boiling for about 10 minutes, I removed it from the fire and immediately put it into the Wonder Bag and closed it up.
4. Now this where I deviated from the suggestions in the Wonder Bag Cookbook. I left the pot in the bag for 4 hours. After about 4 hours, I removed it from the bag, put it back on the stove and reheated it until it boiled. Then I popped it right back in the bag for another 4 hours.
5. I repeated this all day long. Each time I took it out to reheat it on the stove, it took less than 10 minutes to return it to a boil. Then I would re-bag it and go about my day.
6. At night, I reheated the broth for the last time at about 11:30 pm. This time I did not remove it from the bag until 6:30 am when I got up in the morning. It was still nice and hot. I reboiled it two or three more times, until the cartilage was dissolving off the bones, and the broth was thick and rich looking.
7. All in, it took about 30 hours to make this bone broth. And most of that time, I was off working in the high tunnel, doing chores, planting flowers, or anything but cooking!
8. I strained it and poured it directly into quart ball jars, and allowed it to cool to room temperature. It began to gel before it ever went into the fridge.
9. I took it out of the refrigerator the following day. It had gelled into a solid wiggly mass, and it was easy to remove the excess fat that had solidified on the top. This will store for a week or two in the fridge, or longer in the freezer. I like to freeze it in meal size portions ready for adding to vegetables or meats.
Bone Broth is a great regenerator. It supports recovery from disease, depletion, and injury. Bone Broth also supplies vital nutrients, such as collagen, that are lacking in the standard American diet. As we grow older, our bodies stop producing collagen, which causes a break down in our skin, joints and bones. Bone Broth can be added to any vegetable or meat dish, or used in soup and sauces. When taken daily, it can help regenerate bones, teeth, blood, skin, and hair.
It is also very high in minerals that are super absorbable, which boosts the immune and nervous systems in our bodies. Collagen is better absorbed with added Vitamin C, so Bone Broth can be eaten with tomatoes, peppers, kale, broccoli, Brussels sprouts—all of which have more vitamin C than an orange!
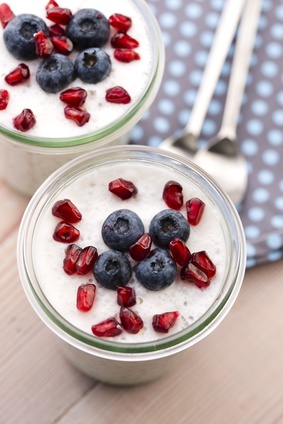
Here is an easy to make vanilla pudding recipe that I love! It is great for times when you need a quick desert, and best of all it is gluten free and dairy free, and free of sugars and artificial sweeteners. Try it–you might love it too!
Vanilla Pudding Recipe
12 oz. coconut milk (the culinary kind—not the ready to drink kind)
3 T. Chia seed
1/2 t. cinnamon or 1 drop cinnamon CO2 extract
1/2 t. ginger powder or 1 drop ginger CO2 extract
1/4 t. stevia powder
1/2 t. alcohol free vanilla extract
Add all ingredients into blender or Vita-mix. Process until all ingredients are thoroughly blended. Pour into desert glasses or a bowl, and let it sit in refrigerator for 2 hours. Garnish with fresh berries and serve.
For the past few years, Michael and I have been living mainly gluten free. I will admit, the switch was not as easy as one might think it could be.
So many of the gluten free recipes I had tried in the past, left me dissatisfied with the results. I had always loved the texture and flavor of whole wheat flour, and nothing else would really measure up for me.
When I finally let go of wheat and all of its relatives (faro, Emmerer, and Kamut), I was astounded at the difference in my level of physical health and well-being. But I was still a bit uninspired by the grain free baking choices that were available.
After a couple of years of experimentation, as well as getting some great recipes from my gluten free daughter, I am much more satisfied with the results when I bake these days.
I now know that one must combine several different types of flour to get a good texture, moist and not dry, while still making sure the dough or batter will stick together.
So here is one of my favorite recipes that meets all of these criteria, while also being naturally low in sugar (yes the blueberries contain some sugar) and DELICIOUS. I hope you will enjoy it as much as we have.
Moist and Gluten Free Blueberry Muffins Recipe
Ingredients:
3/4 cup solid cold-pressed coconut oil
1/2 cup plus 1 tablespoon Xylitol (if you like muffins on the sweeter side, use 1 cup) Here is a link to a company that sells real birch xylitol, made in the USA. I feel it is greatly superior to corn xylitol, which is mostly made in China. http://www.wholeandnatural.com/health-garden-real-birch-xylitol-1-lb/

3 pasture raised chicken eggs

1/4 cup water mixed with 1/4 cup live cultured organic yogurt or nut milk
1/4 teaspoon unrefined sea salt
2 teaspoons aluminum free baking powder
1 tablespoon ground flaxseed
1-1/4 cups almond flour

1/2 cup coconut flour
2 to 3 drops allspice essential oil
2 cups blueberries

Prepare a muffin pan. Line the muffin cups with paper liners, or lightly coat with coconut oil.
Preheat oven to 325 degrees. (I cook mine in a solar oven, which normally only reaches 275 or 300 degrees. In this case you will need to cook them longer).
In a medium size mixing bowl, combine coconut oil, xylitol, and eggs. Whip or stir vigorously until well blended.
Add eggs. Beat them into the batter one at a time.
Add nut milk or yogurt/water mix. Stir well until blended.
Add salt and baking soda. Mix well.
Add flours. Mix well after each addition.
Add allspice essential oil and mix well.
Add blueberries, and stir gently until well blended.
Cook in heated oven until a toothpick inserted in the center of the muffin comes out clean. After 15 minutes, check frequently so that muffins do not over cook and dry out.
Remove muffins from the oven when done. Allow them to cool for a few minutes, then invert the pan on a plate.
Serve them hot or wait until they cool. At our house, they don’t last long!
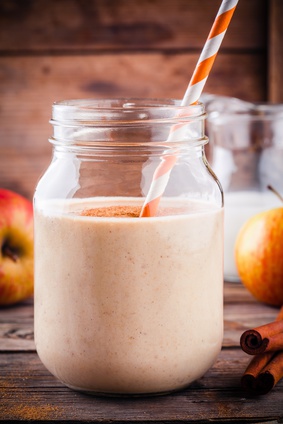
Grapefruit Julius Smoothy Recipe
I have searched for great tasting recipes that include raw egg, as raw eggs are actually more nutritious than cooked eggs. This Grapefruit Julius Smoothy has several variations, including a dairy free version, and a coconut milk version. And the addition of essential oils create a real special flavor!
First you will need 2 cups of almond nut milk.
Put 1/3 cup almonds into a high speed blender or Vita-mix.
Add 2 cups cold water. Blend on high for 3 minutes.
Strain through cheesecloth or a nut milk bag.
Rinse out the Vita-mix container, and add the nut milk back in.
Add 1/2 teaspoon cinnamon and 1/2 teaspoon Sweet Leaf brand powdered stevia extract.
Add 1/4 teaspoon vanilla extract, or 1 inch of dried vanilla bean, chopped.
Add 10 drops pink grapefruit essential oil.
Add 2 whole eggs.
Blend again on medium high setting, for just long enough to thoroughly mix the smoothie.
Pour it in a large glass or mason jar, and top with a sprinkle of nutmeg. Drink and enjoy!
Variations
Coconut milk version: Replace nut milk with 1/2 cup culinary coconut cream, and 1-1/2 cups water.
Dairy friendly version: Replace nut milk with 2 cups hormone free, grass fed yogurt with live cultures. Add an additional 1/4 teaspoon stevia extract.
High protein version: Add 3 tablespoons chia seed to the smoothy. Allow it to sit for 20 ,omits to let the chia seed reach its hydrated state.
Blueberry version: Eliminate grapefruit essential oil. Add 1/2 cup blueberries and 2 drops clove essential oil.

Vibrational Remedies Blending–Dosage Level Dilutions
Vibrational remedies blending is easy. Here’s how to make a dosage level remedy from a stock level remedy.
Fill a glass bottle (1oz or 30 ml), one third full with your choice of vodka, apple cider vinegar, or saturated salt water. (If you choose to use vinegar, fill the bottle half full).
Add your base number (usually 10) of drops of stock level remedy to the bottle.
Fill the bottle up with spring water, distilled water, or other pure water.
Shake at least 100 times.
Label the bottle for convenience.
Now you have a dosage level vibrational remedy. For usage instructions, go here.
We also sell pre-diluted dosage level as well as our stock level remedies.
Making a Custom Blend
Sometimes a blend of several different remedies is the best choice for your remedy. To make a blend, follow these easy steps.
Fill a glass bottle (1oz or 30 ml), one third full with your choice of vodka, apple cider vinegar, or saturated salt water. (If you choose to use vinegar, fill the bottle half full).
Add one to three drops of each stock level remedy you want to include, into the bottle.
Fill the bottle up with spring water, distilled water, or other pure water.
Shake at least 100 times.
Label the bottle for convenience.
Now you have a custom blended dosage level vibrational remedy. For usage instructions, go here.
Making a Super Potency Remedy
Vibrational remedies are a form of homeopathics. Their energetic action actually gets stronger the more they are diluted out. For an increased potency, our vibrational remedies can be diluted out one more time.
To create this super-potent form, take the same number of drops you used to make the dosage essence. From the dosage level remedy, drop this number of drops into a new bottle of pure water and your preservative, and shake it 100 times.
You now have an extra strong level vibrational remedy. We have found this useful for supporting DNA activation, energy healing such as Reiki, soul retrieval, or chakra balancing. It is also useful for people who have a high tolerance for herbal remedies, or do not notice results when they use a regular dosage level remedy.
Saturated Salt Water–a beautifully light preservative
Vibrational remedies usually require some form of natural preservative when made by hand. We use pure, saturated salt water in many of our vibrational remedies as a preservative.
- We use a dark bottle that will decrease light exposure. Miron violet glass preserves the energetic integrity of our vibrational remedies, and will do so for years when properly stored.
- We use a combination of salts from sacred sites, including an ancient indigenous salt cave near our home.
- We feel that using sacred salt brings a deep energetic connection to the elemental forces, helping those who use our remedies to feel grounded and connected with the Earth.
None of our products are recognized or approved by the FDA. They are not intended to diagnose, treat, or cure any disease. This information is anecdotal, and is provided for educational purposes only. It is not meant to be taken as medical advice. See a health care professional for medical advice.

This simple recipe is so fulfilling and tasty! It can be altered to suit almost any taste. Best of all, it is gluten free.
Combine in a covered bowl:
- Gluten free organic oats (“Quick” oats break down more and are the most easily digested. Whole oats can be used, and if so would be best left on the counter to ferment for up to 72 hours).
- Chopped pecan pieces
- Goji berries, blueberries, or raisins
- Dehydrated maple sprinkles, raw sugar, or slices of dates or figs as sweetener
- Flax seeds
- Chia seeds
- 1 Tablespoon plain yogurt or kefir with live cultures
- Cassia essential oil, and allspice essential oil, a couple of drops each
- Pure spring water or mineral water
Let the mixture sit overnight, or longer for a deeper fermentation. In the morning, stir and eat.
Overnight Oatmeal Recipe Variations
Add small apple slices.
Add a drop of vanilla bourbon.
Use dried chopped apricots in place of berries.
Add organic carob or cocoa powder.
Add cinnamon and cloves.
Substitute almonds, walnuts, or pumpkin seeds for pecans.

Nothing beats dried nettles herb for regenerating the body. It is a tonic herb, safe and effective for supporting recovery from fatigue, hormonal imbalances, blood sugar imbalance, and many other conditions.
Nettles Physical Properties
Observations and Anecdotal Information
Nettles herbal tea has shown promise in treating Alzheimer’s disease, arthritis, and asthma. It is helpful for bladder infections, bronchitis, bursitis, gingivitis, and gout. It helps hives, kidney stones, and laryngitis. It is also a helpful herb for relieving body pain.
It has been used in treating multiple sclerosis, PMS, prostate enlargement, sciatica, and tendinitis. It is strengthening to the lungs and respiratory system, and can help reduce allergies. It is a known liver regenerator and endocrine tonic.
In Germany, nettles is sold as an herbal drug for prostate diseases.
The tea can also help to lessen the swelling of hemorrhoids (used topically). It has been used to stop bleeding from minor injuries. It is an astringent which shrinks and tightens the skin and mucous membranes. It may also be used topically for dandruff and oily hair and scalp.
Allergies
One of my personal favorite uses for nettles, is as an herbal allergy treatment. Many people in our locality suffer from allergies in the spring and summer months. The symptoms of this allergy include runny nose, respiratory congestion, and sneezing.
Drinking a tea of dried nettles every morning, beginning in late winter before plants begin to leaf out, will eliminate these symptoms for many people, and greatly reduce them for others. If you suffer from seasonal allergies, it is really worth your time and effort to give nettles a try.
Cautions
- May not be suitable during pregnancy and lactation, or for children under 6. Consult your health care practitioner for use in these situations.
- No known interactions with drugs and pharmaceutical medications.
- Nettles is considered to be generally recognized as safe at normal dosages.
None of our products are recognized or approved by the FDA. They are not intended to diagnose, treat, or cure any disease. This information is anecdotal, and is provided for educational purposes only. It is not meant to be taken as medical advice. See a health care professional for medical advice.
More about our disclaimer.

Tempeh Toss is made with tempeh, the lesser known soy food protein source.
Tofu is the best known source of plant based protein. Tofu is refined, made of soy bean milk that is pressed in forms and allowed to drain like cheese. Its protein content is around 12 grams of protein in 4 ounces of tofu.
Tempeh is a fermented food, made of whole fermented soy beans. Because it is unrefined, its protein content is almost double that of tofu, weighing in at 22 grams per 4 ounce serving.
Both of these protein sources are packed with B vitamins, folate, isoflavones, iron, potassium, and dietary fiber. They also improve calcium and vitamin K levels.
Tempeh Toss Recipe
Into a medium fry pan, add
- chopped celery
- diced mushrooms
- chopped asparagus
- chopped onion
- black-eyed peas (pre-cooked)
- shredded beets
Add a couple of tablespoons of olive oil and cook over medium heat, stirring constantly. Add 2 drops ginger essential oil and 1 drop sweet basil essential oil. Toss and stir.
Just before removing from heat, add crumbled tempeh and stir, allowing tempeh to get warm but not to cook. Serve immediately with a dash of olive or sesame oil and a sprinkle of natural sea salt.
This is a great, simple to cook and delicious, one pot meal!